Good to know
You must have the appropriate rights to create an event
Every step below contains a link to a more detailed article.
Description
Create a livestream event by following the steps described below.
Log in
First, log into LiveStream Pro with your credentials.
Create an event
After logging in, you will see a list of existing events.
.png)
To create a new event, click "Create event".
.png)
In the Event Details tab, enter the following information:
an event name (this name is shown to the viewers by default, but you can customize a public title in the Language tab and use this title as an internal title)
time and date of the event
duration of the event
toggle if you want to hide the date, time and duration information for viewers on the event page
Then click on "Save" and proceed to "Next: Set Event Permissions".
Event Permissions
Here you can configure which channel members can manage your event. This is helpful if multiple teams work in the same channel.
.png)
Then click on "Save" and proceed to "Next: Set Language".
Language
After entering the event details, select the desired event languages. If you are using AI live subtitles for this event, the primary event language will be used as the stage language.
You can also define a public event title that will be visible under the livestream player for your viewers.
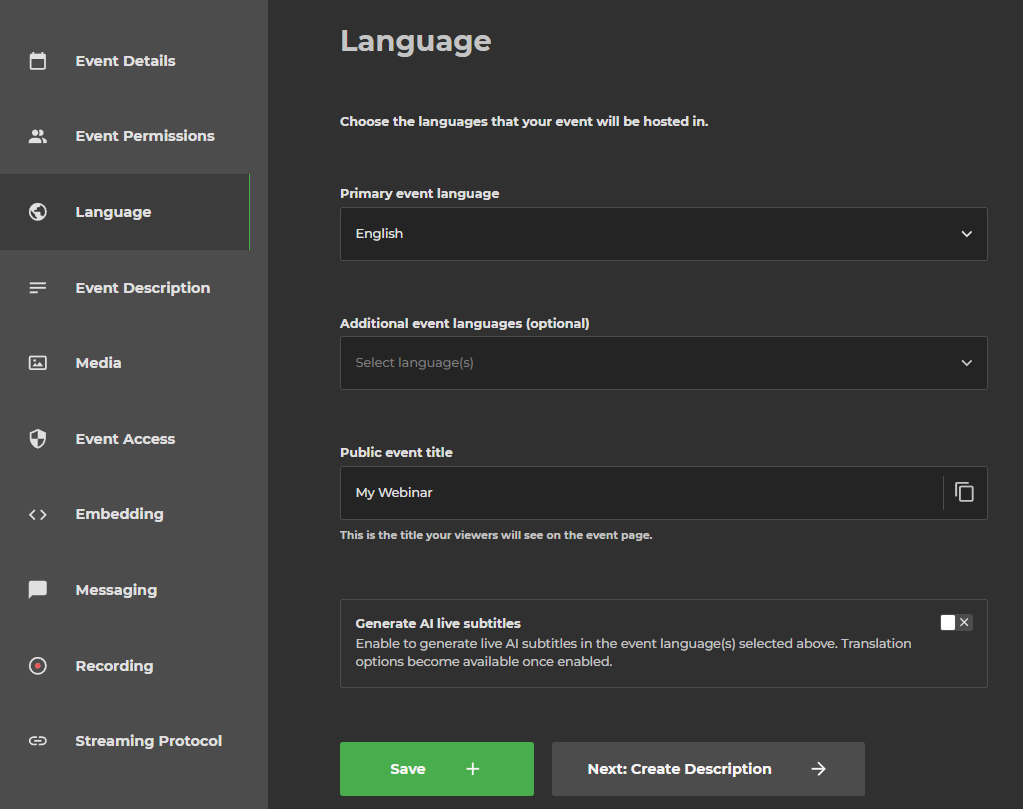
Generate AI live subtitles
If you activate this feature, you can select which languages should be available as subtitles in your livestream. Please note that the primary event language is used to transcript the stage language.
Please note
When the AI live subtitles are activated, the live stream is delayed by 20 seconds. The first display of the subtitles may also vary depending on the language: For German and English it takes up to 1 minute, for other languages up to 15 minutes.
Start preparing your live event around 30 minutes beforehand and send an ingest signal to the server for monitoring in the operator.
.png)
After selecting the desired language, AI live subtitles and saving your changes, click Next: Create Description.
AI subtitles are not activated by default
Reach out to your Customer Success Manager to enable this feature.
Event Description
In this tab you can customize the event description for the intro-, live- and outro-state of your event.
.png)
After making your changes, proceed to the next step: "Next: Add Media".
Media
You can customize your intro, live and outro pages during the event in this tab. Specifically, you can upload a cover image or embed a video from your VideoManager Pro account.
Also you can upload a PDF presentation with slides.
.png)
After making your changes, proceed to the next step: "Next: Set Event Access".
Event Access
Access with Single Sign-On
If your account is SSO-enabled, you will be able to restrict embedding.
You can determine if your event
can be accessed publicly
is protected with an access code
requires viewers to provide their e-mails.
or requires Single Sign-On.
.png)
After determining the viewer access setting, proceed to the next step: "Next: Embedding".
Embedding
In this tab you can apply restrictions to embedding and activate HMAC token authorization.
.png)
Proceed to the next step: "Next: Set Messaging."
Messaging
In this step, you can disable or enable the chat or Q&A for your event.
.png)
After determining your messaging settings, click on Next: Set Recording.
Set Recording
You can record and store your event directly in LiveStream Pro. If desired, the recording can also be uploaded to a specified VideoManager Pro account.
You can also disable recording of your event by unchecking the first option.
.png)
Proceed to the next step and click "Next: Set Protocol".
Set streaming protocol
Choose which streaming protocol will be used for your livestream.
Specifically, you can select one of the two available streaming protocols: RTMPS or SRT.
.png)
Proceed to the final step and click "Next: Show Summary".
Setup summary
The summary page displays important information about your event:
sharing link
embed code
server URL
backup server URL
streaming key
streaming server authentication, including the username and password
.png)
Conclusion
You have now created your livestream event. Now, you can access both the Operator, where you can control the livestream event, and the Viewer, which your viewers will see.
Your newly created event will now appear in the event list. Click on the event itself to access the event setup.